Key takeaways
- Access comes from a Shopify custom app you create in the admin – private apps are deprecated.
- Grant the smallest scopes that do the job –
read_ordersis the core one. - You must install the app before Shopify shows the Admin API access token.
- The token is shown once – copy it immediately, and re-install after any scope change.
What the connection does
With read access to your orders, an AI Chat Agent built for e-commerce can answer “where is my order?” and pull the right details into a conversation – in the shopper’s own words, at any hour. Shopify exposes this through its Admin API, and the modern way to authenticate is a custom app with an Admin API access token. Shopify’s older “private apps” are deprecated – custom apps replace them, and they work whether you create them in the admin (below) or with the Shopify CLI.
Before you start
| Requirement | Where to check / set it |
|---|---|
| The store owner or a staff/collaborator with the Develop apps permission, plus rights to the resources the app will read (e.g. orders) | Settings → Users |
| A store on the Basic plan or higher (needed for the Admin API to orders) | Settings → Plan |
An external developer can be added as a collaborator, which does not count toward your staff limit – useful if a partner sets the app up for you.
Step 1 – Enable custom app development
- Sign in to Shopify admin (
{your-store}.myshopify.com/admin). - Go to Settings → Apps and sales channels → Develop apps.
- Click Allow custom app development and confirm the warning. This is a one-time switch for the store.
Step 2 – Create and configure the app
- In Develop apps, choose Create an app; name it (e.g. AskSpot Order Sync) and pick a developer.
- Open Configuration → Admin API integration → Configure.
- Select the minimum scopes (see below), then Save.
Which scopes to add
Add only what the Agent needs. For order answers that means one required scope and two optional ones:
read_orders– required. Covers recent orders; useread_all_ordersonly if you need the full historical archive (older than 60 days).read_fulfillments– optional; add it if you also surface fulfilment / shipping status.read_products– optional; add it only if the Agent pulls product data on this store.
Step 3 – Install the app and copy the token
- Open the API credentials tab and click Install.
- After installing, Shopify shows three values – copy them now:
| Field | Description |
|---|---|
| Admin API access token | The secret used to authorize (shown only once – copy it immediately). Usually starts with shpat_. |
| API key (Client ID) | The app’s identifier. |
| API secret key | The signing secret (used for OAuth / webhook verification). |
The Admin API access token appears only once, right after installation. Copy it straight away – if you lose it you will have to uninstall and reinstall the app to get a new one.
Changing scopes later
You can widen or narrow the app’s access at any time under Configuration → Admin API integration → Edit scopes. New scopes only take effect after you reinstall the app – Shopify prompts you to approve the updated permissions. The Admin API access token itself does not change when you do this.
Fix the usual errors
- “This action requires merchant approval for read_orders scope” – the scope was not granted, or the app was not reinstalled after the scope changed. Add the scope, then reinstall.
- 401 Unauthorized – the token is wrong or was regenerated. Copy the current Admin API access token again.
- Changed scopes and nothing updated? – scope edits only take effect after you reinstall the app.
Step 4 – Add the token to AskSpot
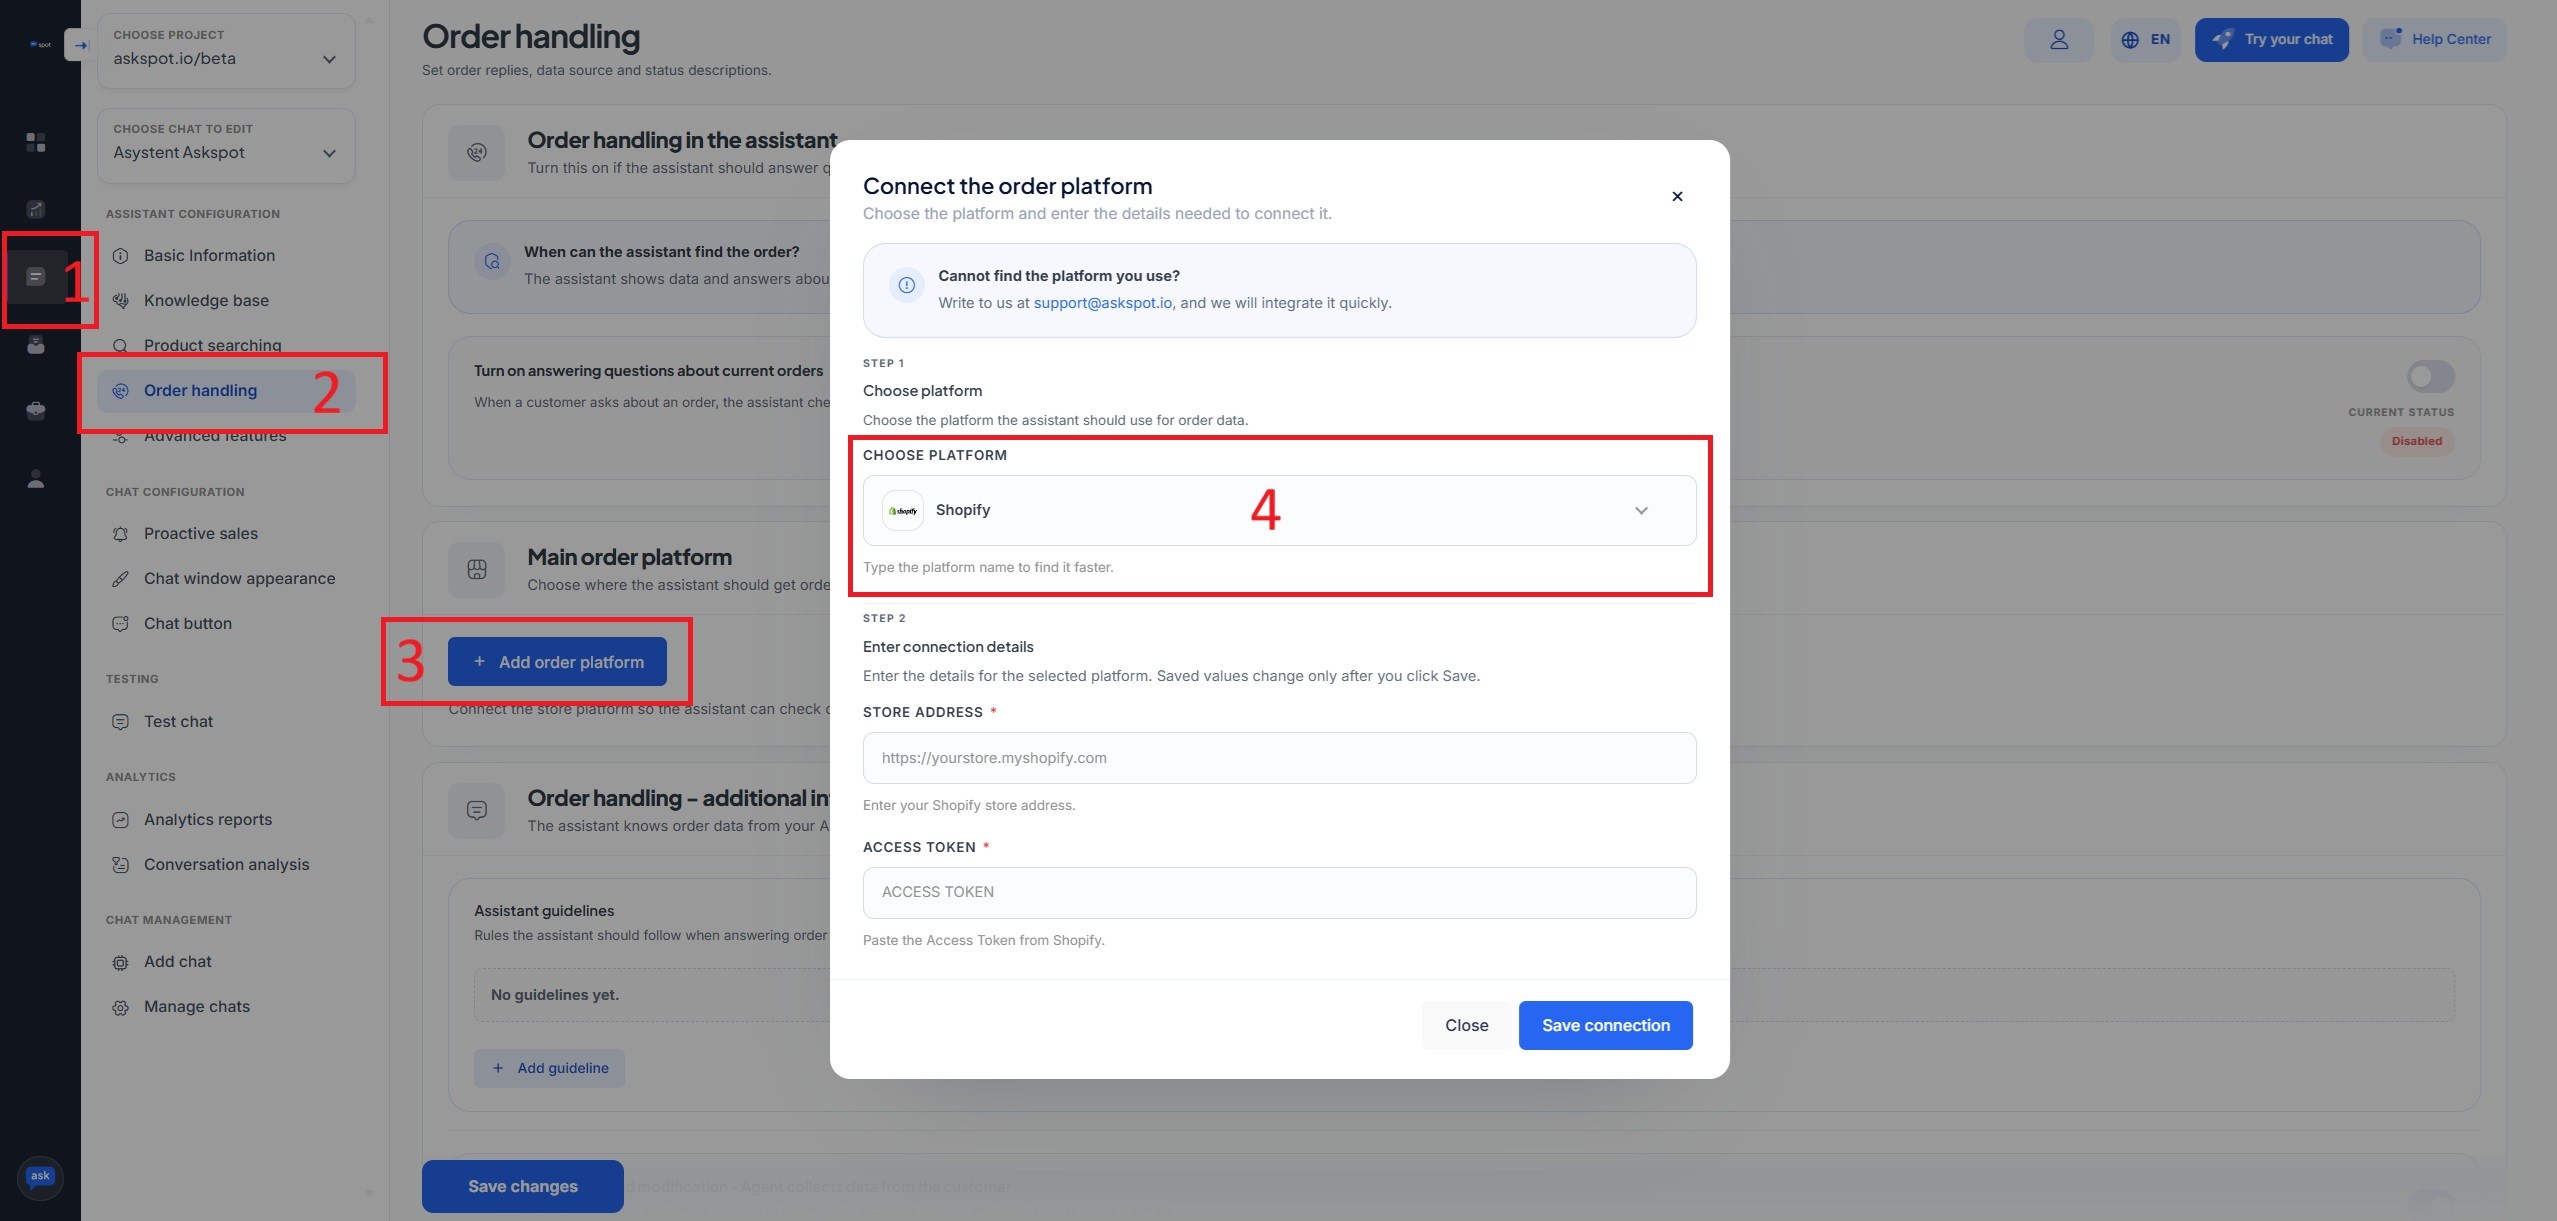
That is the Shopify side done. You add the connection yourself in the AskSpot partner panel – there is no need to send us the token:
- Sign in to partners.askspot.io.
- Open the AI Chats section and go to Order handling.
- Click Add order platform and choose Shopify from the list.
- Enter your Store address (with
https://, e.g.https://yourstore.myshopify.com) and paste the Admin API access token into the Access token field, then click Save connection.
Under the hood the Agent calls the Shopify Admin API with your token, for example:
{
  "url": "https://{shop}.myshopify.com/admin/api/2025-07/orders.json",
  "method": "GET",
  "headers": {
    "X-Shopify-Access-Token": "<Admin_API_access_token>",
    "Content-Type": "application/json"
  }
}
Stuck? Ask the Help center. The AskSpot panel has a Help center in the top-right corner. Tell it what you want to set up and it walks you through connecting and configuring the Agent – you don’t have to do it alone.
From then on the Agent reads orders straight away – the connection behind “where is my order?” answered without a human.
For placement modes, display options and the full picture, see the Shopify integration.
Next – measure conversions. Once the chat is live, connect Google Analytics to see which conversations lead to sales. See how to track the AskSpot chat in Google Analytics.
Do I use a private app or a custom app?
A custom app. Shopify has deprecated private apps; custom apps created in the admin (or via the CLI) are the current way to get an Admin API access token.
Which scopes does AskSpot need?
read_orders is the core scope. Add read_fulfillments if you surface shipping status, and read_products only if the Agent pulls product data on this store. Grant the least you need.
I changed the scopes but the API still refuses – why?
Scope changes only apply after the app is reinstalled. Edit the scopes, save, then reinstall the app so the new permissions take effect.
What if I need orders older than 60 days?
read_orders covers the last 60 days. For the full historical archive, request the read_all_orders scope as well – Shopify requires a reason for it during setup.
Official references
For the authoritative, always-current details, see Shopify’s own documentation: