Key takeaways
- WooCommerce talks to AskSpot through the built-in REST API – no extra plugin needed.
- You generate one key pair (Consumer Key + Secret) in the WooCommerce settings.
- Read permission is enough for the Agent to answer order and product questions.
- The Secret is shown only once – copy it before you close the screen.
What the connection does
WooCommerce ships with a REST API turned on by default (version 3.5 and newer), so an AI Chat Agent built for e-commerce can read your catalog and order data through it – no legacy API to enable, no separate connector plugin. Authentication is a single Consumer Key / Consumer Secret pair you generate once and paste into AskSpot. From then on the Agent can look up an order status or pull the right product into a recommendation, in the shopper’s own words.
Before you start
Four things need to be in place. Most stores already have all of them.
| Requirement | Where to set / check it |
|---|---|
| WooCommerce installed and active | Plugins → Installed Plugins |
| An Administrator account (or a role that can open WooCommerce settings) | Users → Profile |
| Permalinks not set to “Plain” (e.g. “Post name”) – the REST API needs pretty permalinks to route requests | Settings → Permalinks |
| HTTPS enabled – recommended, and required for the credentials (Basic Auth) to travel safely | Hosting / SSL certificate |
Step 1 – Generate your REST API keys
- Sign in to your WordPress admin.
- Open WooCommerce → Settings → Advanced → REST API.
- Click Add key (labelled “Create an API key” on some versions).
- Fill in the form – Description: AskSpot; User: an account with access to orders; Permissions: Read (see the next section).
- Click Generate API key. WooCommerce shows the Consumer key (starts with
ck_) and Consumer secret (starts withcs_) – copy both now.
The Consumer secret is displayed only once. Copy it straight away – once you leave the screen WooCommerce will not show it again, and you would have to generate a new key.
Read, or Read and Write?
Pick the narrowest permission that does the job. For answering order and product questions, Read is enough – and it is the safer default, because a read-only key can never change anything in your store. Choose Read/Write only if your setup also needs the Agent to write back to WooCommerce; if you are not sure, start with Read and widen it later.
Step 2 – Test that the keys work
Before pasting the keys into AskSpot, confirm they authenticate. Call the orders endpoint with the key pair in the query string:
GET https://your-store.com/wp-json/wc/v3/orders?consumer_key=ck_XXXXX&consumer_secret=cs_XXXXXAlternatively, use HTTP Basic Auth – the Consumer Key as the username (ck_…) and the Consumer Secret as the password (cs_…). A list of orders back means the credentials are valid.
Fix the usual errors
- 401 Unauthorized – the key or secret is wrong, or the chosen user has no access to orders. Re-check both, and the user’s role.
- “Consumer key is missing” – your server strips the Authorization header. Pass the keys in the query string instead, or enable “include credentials in the query”.
- 404 on the endpoint – permalinks are set to “Plain”. Switch to “Post name” under Settings → Permalinks and try again.
- Local or self-signed HTTPS – if you are testing against a staging site with a self-signed certificate, turn off SSL verification in your API client.
Step 3 – Add the keys to AskSpot
That is the WooCommerce side done. You add the connection yourself in the AskSpot partner panel – there is no need to send us the keys:
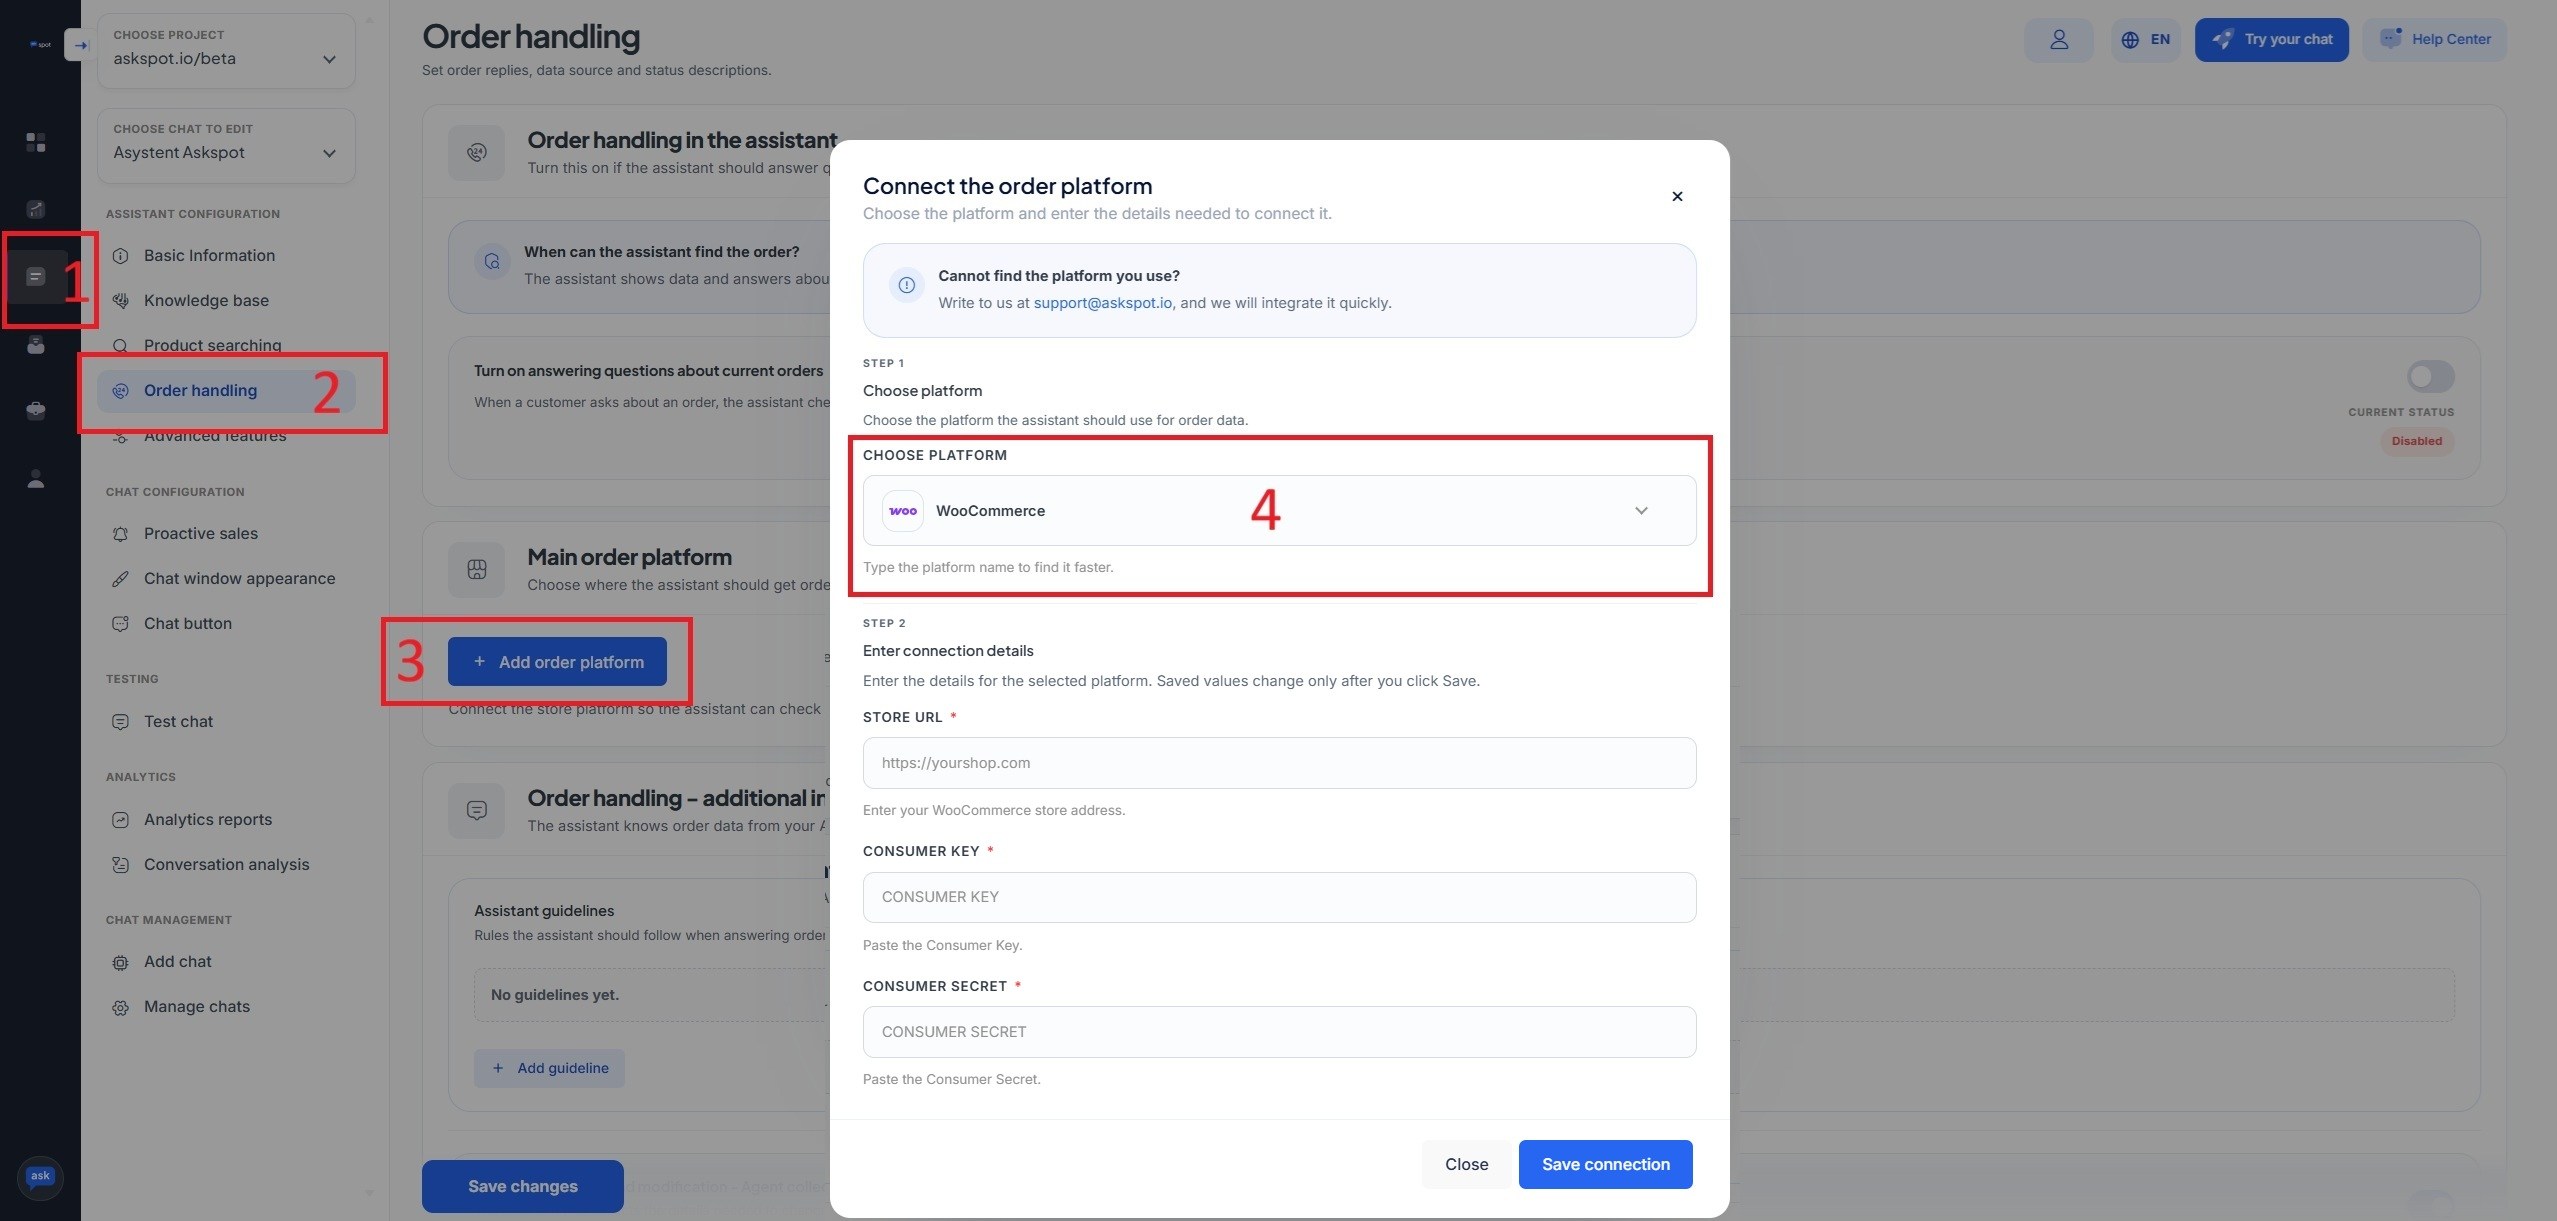
- Sign in to partners.askspot.io.
- Open the AI Chats section and go to Order handling.
- Click Add order platform and choose WooCommerce from the list.
- Enter your Store URL (with
https://, e.g.https://yourshop.com), then paste the Consumer Key and Consumer Secret into their fields and click Save connection.
Stuck? Ask the Help center. The AskSpot panel has a Help center in the top-right corner. Tell it what you want to set up and it walks you through connecting and configuring the Agent – you don’t have to do it alone.
From then on the Agent reads orders and products straight away – the same connection that lets it answer “where is my order?” and surface the right product in a recommendation. You can revoke or regenerate the key at any time from the same WooCommerce → Settings → Advanced → REST API screen.
For placement modes, display options and the full picture, see the WooCommerce integration.
Next – measure conversions. Once the chat is live, connect Google Analytics to see which conversations lead to sales. See how to track the AskSpot chat in Google Analytics.
Do I need a plugin to connect WooCommerce to AskSpot?
No. WooCommerce 3.5 and newer have the REST API enabled by default, so you only generate a key pair in the settings – there is nothing extra to install.
Should I choose Read or Read/Write permissions?
Read is enough to answer order and product questions and is the safer choice, since the key cannot change anything. Use Read/Write only if your setup needs the Agent to write back to the store.
I did not copy the Consumer Secret – what now?
The secret is shown only once and cannot be retrieved later. Delete the key and generate a new one, then copy the secret before leaving the screen.
The endpoint returns a 404 – why?
The REST API needs pretty permalinks. If permalinks are set to “Plain”, switch to “Post name” (or any non-Plain option) under Settings → Permalinks, then retry.
Official references
For the authoritative, always-current details, see WooCommerce’s own documentation: