Key takeaways
- Shoper connects through its WebAPI – you create a dedicated admin user with WebAPI access.
- Put the user in a separate permissions group so it can reach only what it needs.
- Grant read access to Orders, Customers and Shipments – nothing else.
- You add three things yourself in your AskSpot panel: the store URL, and the API login and password (entered as Client ID and Client Secret).
What the connection does
Shoper exposes your data through its WebAPI. You create a dedicated API user – scoped to a group that can only read orders, customers and shipments – and add its login in your AskSpot panel. From then on an AI Chat Agent built for e-commerce can check an order status or a tracking number and answer “where is my order?” in the shopper’s own words, at any hour. Because the user is its own account in its own group, you can revoke it any time without touching your team’s access.
Before you start
- Access to the Shoper admin as an administrator.
Step 1 – Sign in
Sign in to your Shoper admin panel.
Step 2 – Create a permissions group
A separate group keeps the integration to exactly what it needs – no access to settings, payments or the storefront’s look.
- In the left menu go to Settings → General → Administrators.
- Open the Administrator groups tab at the top.
- Click Add group (top-right).
- Fill in the Group name (e.g. API integration) and tick WebAPI access – this is the key setting; without it the connection will not work.
- Under Permissions, tick only Orders (order statuses), Customers (to verify the e-mail address) and Sales / Shipments if it is a separate category (parcel tracking) – in read / view mode where offered.
- Click Save.
Step 3 – Create the API user
- Back in Settings → General → Administrators, click Add administrator.
- Set a Login (e.g. api_connector) and a strong Password – save both, you will add them in your AskSpot panel.
- Add a name (e.g. API integration) and any e-mail (yours or a technical one).
- Set Administrator group to the group from Step 2, and make sure Active is set to Yes.
- Click Save.
Step 4 – Add the connection in AskSpot
That is the Shoper side done. You add the connection yourself in the AskSpot partner panel – there is no need to send us anything:
- Sign in to partners.askspot.io.
- Open the AI Chats section and go to Order handling.
- Click Add order platform and choose Shoper from the list.
- Enter your Store address (with
https://, e.g.https://yourshop.shoper.pl), then paste your API login into Client ID and your API password into Client Secret, and click Save connection.
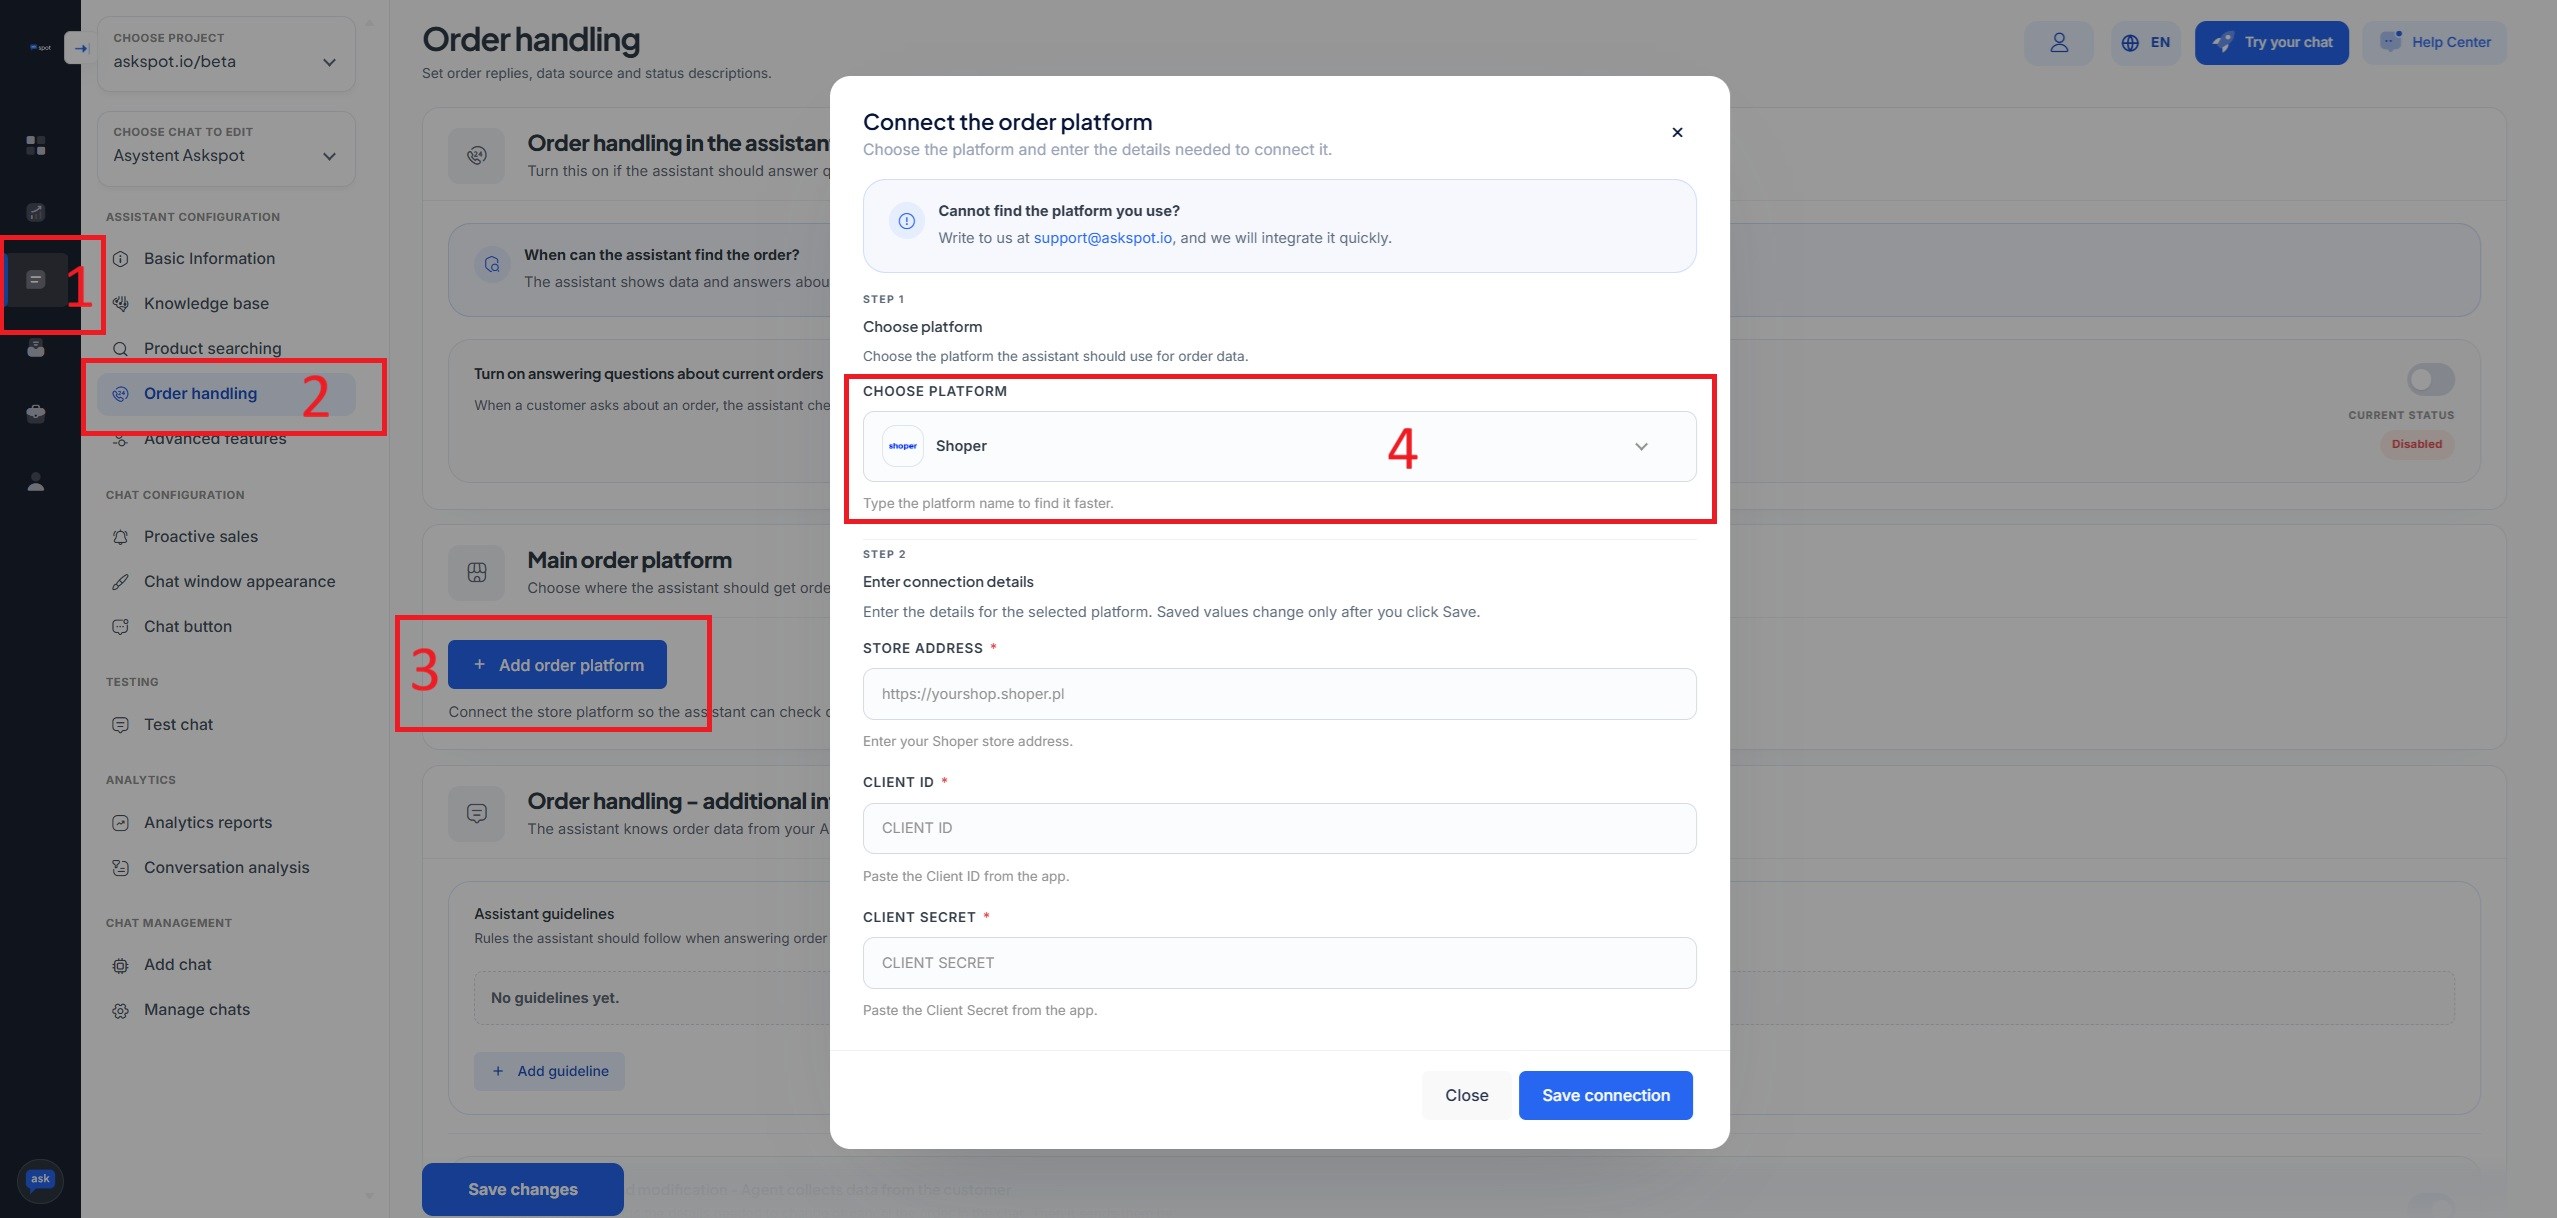
The field names differ – it’s the same two values. AskSpot’s panel labels the credentials Client ID and Client Secret; in Shoper these are simply your API user’s login and password. So: Client ID = your Shoper API login, Client Secret = your Shoper API password.
Stuck? Ask the Help center. The AskSpot panel has a Help center in the top-right corner. Tell it what you want to set up and it walks you through connecting and configuring the Agent – you don’t have to do it alone.
From then on the Agent reads orders straight away – the connection behind “where is my order?” answered without a human.
For placement modes, display options and the full picture, see the Shoper integration.
Next – measure conversions. Once the chat is live, connect Google Analytics to see which conversations lead to sales. See how to track the AskSpot chat in Google Analytics.
Do I need a plugin to connect Shoper to AskSpot?
No. Shoper has a built-in WebAPI. You create a dedicated admin user with WebAPI access and grant read permissions – nothing extra to install.
Why a separate user and group?
So the integration reaches only orders, customers and shipments – not settings, payments or the storefront. It is its own account, so you can revoke it any time without affecting your team.
The connection does not work – what should I check first?
Make sure WebAPI access is ticked on the group, the user is Active and assigned to that group, and the login and password are exactly as saved.
Official references
For the authoritative, always-current details, see Shoper’s own documentation: